These photo were posted on my Flickr account (SteveSchwarzPhotography). I no longer upload to this account. The photos below link directly to the Flickr account. If you have any questions, or comments about these photos – drop me aline,
These photo were posted on my Flickr account (SteveSchwarzPhotography). I no longer upload to this account. The photos below link directly to the Flickr account. If you have any questions, or comments about these photos – drop me aline,

Twin Pine Hill – one of best places to enjoy a scenic view of Old town Yellowknife, and Great Slave Lake. These 360 degree panoramas were created from photos taken on May 18th, 2014.
In this view, Old Town is in the distance, to the north. Franklin Avenue (center of photo) separates Peace River Flats and Willow Flats (right side) and continues to Latham Island and N’Dilo in the distance. If you look carefully, the melted remnants of the Snow Castle can be seen, along with house boaters commuting across the ice, and a even a kite skier behind the houseboats.

Click on the image for a larger view.
To view the 360 degree animation. Click Here. This requires the QuickTime Player. Click the icon on the upper right corner of the animation to get a full view. Depending on network speed, the image may take a moment to load.
In this image, along the ridge to the southeast of the previous photo, Old Town (Willow Flats) is on the far left. The road winding up the hill is School Draw, an the remains of a recently burnt house can be seen in the center part of the photo.

Click on the image for a larger view.
To view the 360 degree animation. Click Here. This requires the QuickTime Player. Click the icon on the upper right corner of the animation to get a full view. Depending on network speed, the image may take a moment to load.
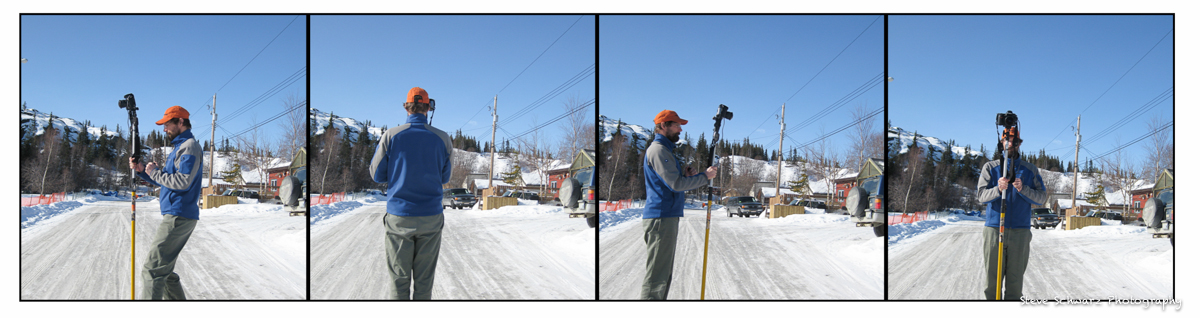
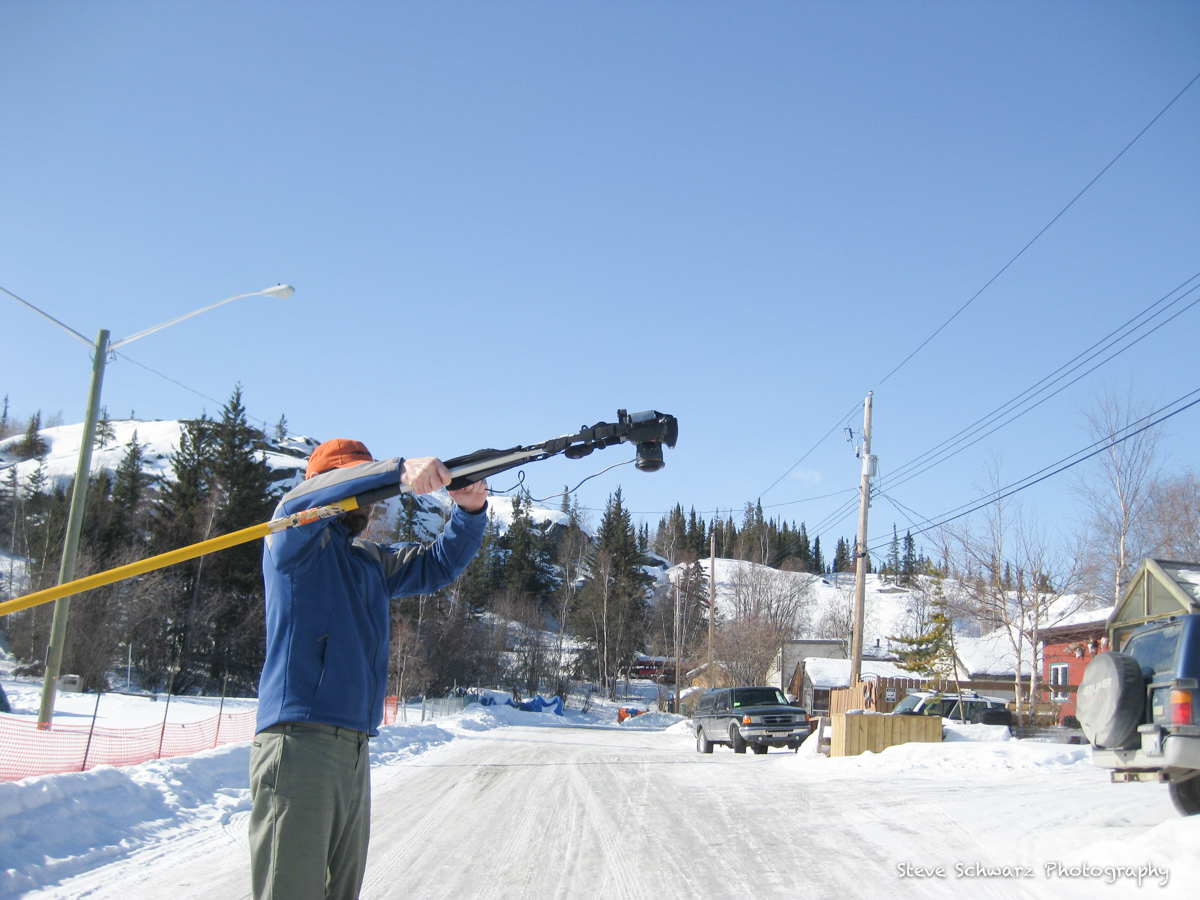
These panoramas were created by combining 5 photos (4 photos at 90 degrees to each other, and the fifth taken straight down at my feet to fill in a gap), using a Nikon D700, a ‘shaved’ Samyang 8mm lens with a custom built panorama head see Making Panoramas with a DIY Panoramic Head and a Monopole. The hardest part of making these panoramas was photoshopping out all the garbage and smashed bottles…

These notes describe the tools and technique that I use to create 360 and spherical panoramas. If you are interested in producing high resolution landscape or architectural panoramas – this is not for you as these types of panoramas require different tools (panorama heads, tripods and lenses). Check out the links below on tools and techniques to create high resolution and architectural (including interior) panoramas.
360 degree panoramas are best described as panoramas that cover up to 360 degrees in a single, super wide image, whereas Spherical panoramas can be described as the viewing of a seamless 360 degree panorama that is displayed on a interactive viewer (e.g. QuickTime VR, Flash or HTML5), and allows the observer (i.e. You) to interactively pan left or right, up and down and zoom in or out to look at the scene in different directions. The end result of spherical panoramas, is to give the observer the feeling of actually “Being there and looking around”.
The first step in making spherical panoramas is to create a seamless 360 photograph, that is wrapped in a sphere or cylinder. There are different methods to capture the separate photos that are stitched to create the seamless 360 degree image; ranging from more accurate (panoramic heads with lens specific clicks) to free hand (dangling a weight from a string over a specific feature on the ground). All methods require that the camera is rotated through an imaginary point ‘entrance pupil’ near the front of the lens to avoid (or minimize) visual off-set (parallax) when stitching the photos. Generally, the fewer images to stitch the less effect of parallax.
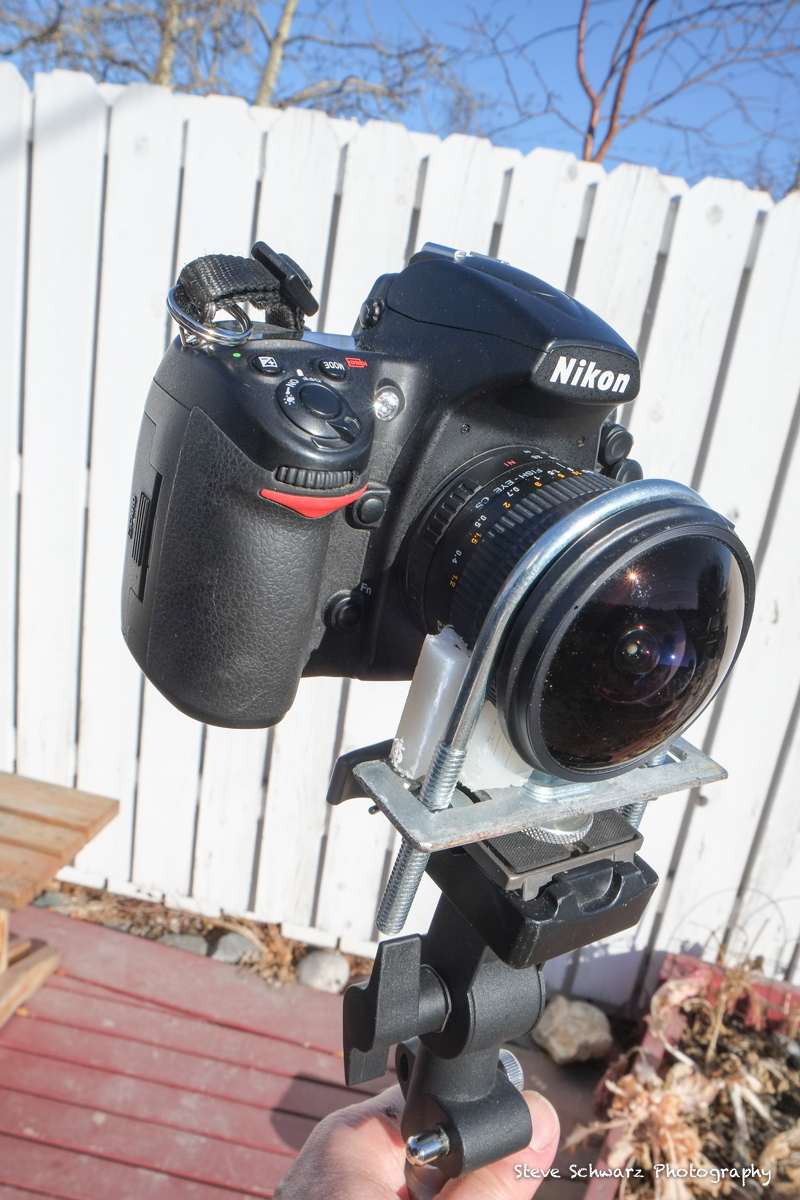
The tools that I use include a Nikon D700 camera, Samyang 8mm f/3.5 lens, a very simply DIY (make-it-yourself) panorama head, remote cable, and a monopole. Previously I did not use a panorama head, and simply mounted the camera to the monopole using the tripod screw on the base of the camera. This method works well as long there are no objects close to the lens (i.e. wide open areas), which cause parallax. Now, with a simple DIY panorama head (total cost approx. $10.00) there are fewer problems with parallax. Do note – that these tools and techniques work for me, and may not work for you, nor is this technique necessarily the correct or most accurate.
From top to bottom, I use the following camera gear and tools.
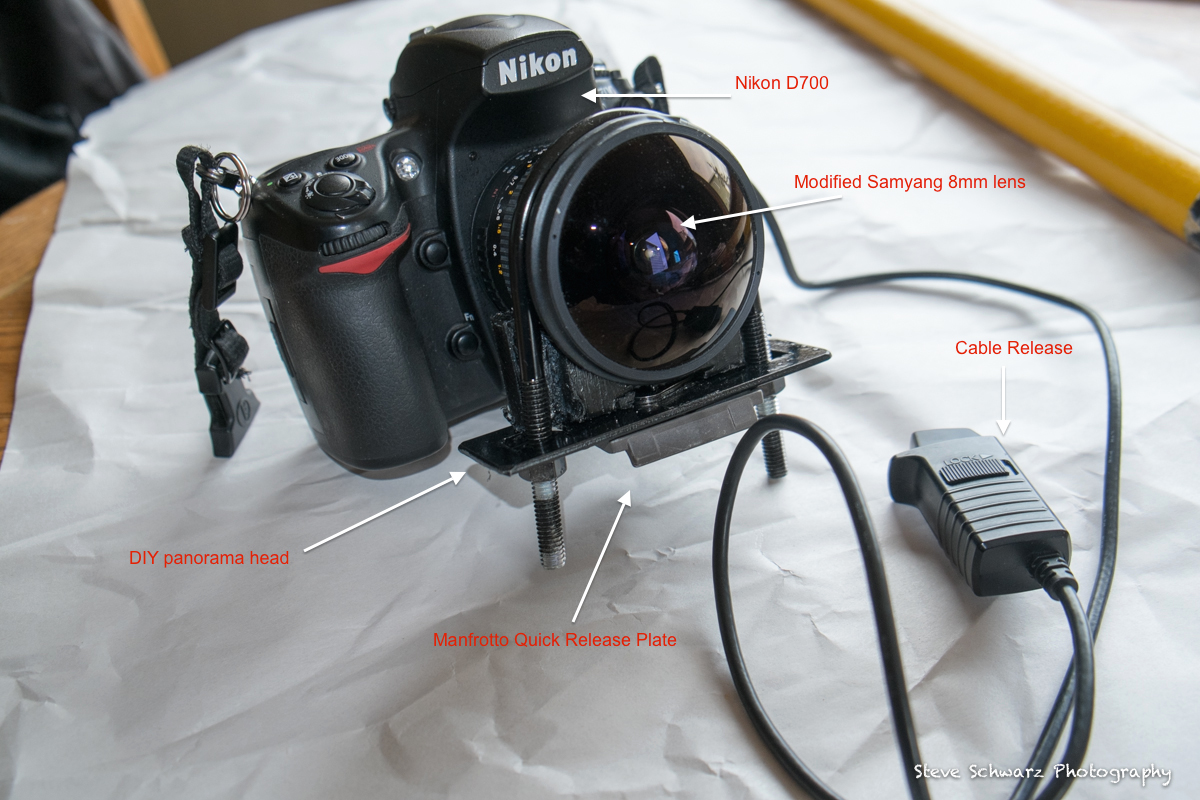

My initial plan for a DIY panorama head was piece of metal plate that attached at one end to the camera tripod screw the the other end extending to the entrance pupil of the lens. However, the thought of the relatively heavy Nikon D700 bouncing up and down on the metal plate deterred that plan. Plans then turned to some way of attaching the front of the lens directly to the monopole. Then I found a muffler clamp. Sliding the muffler clamp over the entrance pupil of the lens – it was a close fit, and the U-shaped clamp only had to be widened by approximately 0.5cm. Scrap UHMW plastic was used to fill in gaps between the lens and the muffler clamp. A sheet of scrap metal (steel) was cut and drilled for the base, and two ¼ thread nuts are used to tighten the muffler clamp (finger tightened only). A coat of black automotive paint and adding the Manfrotto Quick Release Plate – then done !.
Total cost approx $10.00.
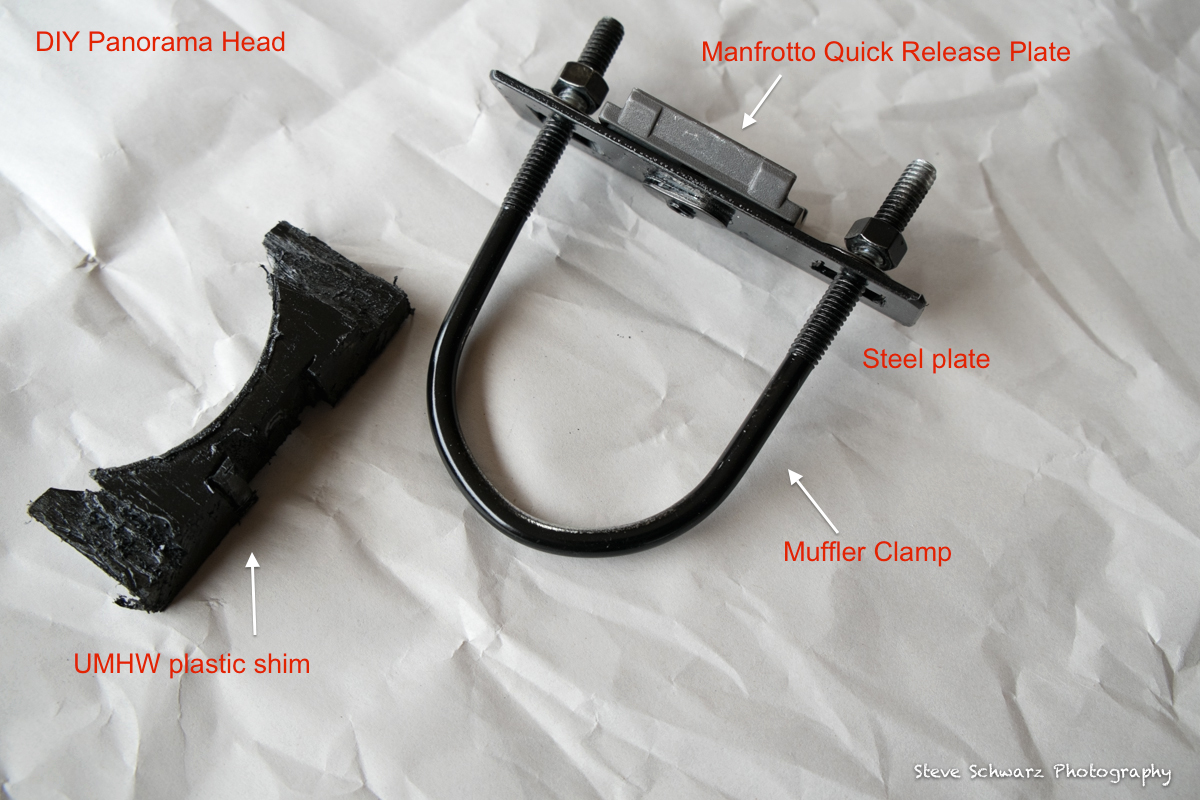
Note that the axis of rotation passes through the centre of the lens and the Nodal Point (entrance pupil).
These are the camera settings that I use;
1) File format set to ‘Raw’
2) Exposure mode set to ‘Manual’ – Set shutter speed minimum 1/30, aperture f/5.6 to f/10 depending on light conditions. Determine exposure for average light reading, not with lens pointed at the sun.
3) Set focus to manual
4) Set camera to full frame mode
Shooting Technique
To make my life easier, I always use the same lens and camera combination for spherical panoramas. With the shaved Samyang 8mm, I shoot four images each at 90 degrees apart (camera level).
One I have the four (or six) photos, they are loaded into PTGui software to create the seamless 360 degree panorama and the spherical panorama. Check the links below for how to use PTGui software. PTGui saves the spherical panorama as a Flash (.swf) movie that can be displayed on a website.
Examples of Flash (.swf) movies
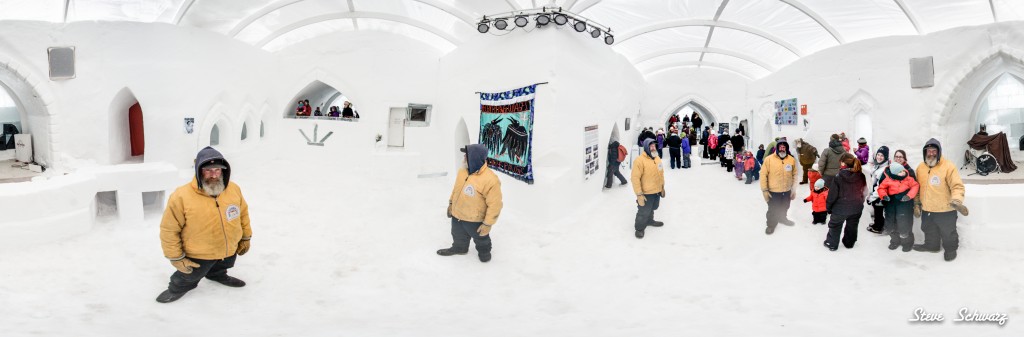
A view of the inside of the Snowking’s Castle, during the 19th annual Snowking Winter Festival. Click on the image for a larger view. To view the 360 degree animation. Click Here. This requires the QuickTime Player. Click the icon on the upper right corner of the animation to get a full view. Depending on network speed, the image may take a moment to load.
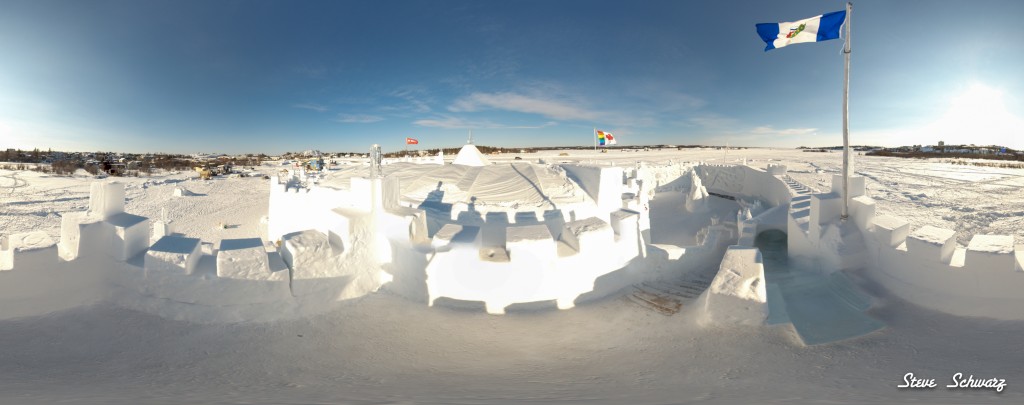
The view from the top of the Castle, and the “Deadman’s slide”. Click on the image for a larger view.
To view the 360 degree animation. Click Here. This requires the QuickTime Player. Click the icon on the upper right corner of the animation to get a full view. Depending on network speed, the image may take a moment to load.
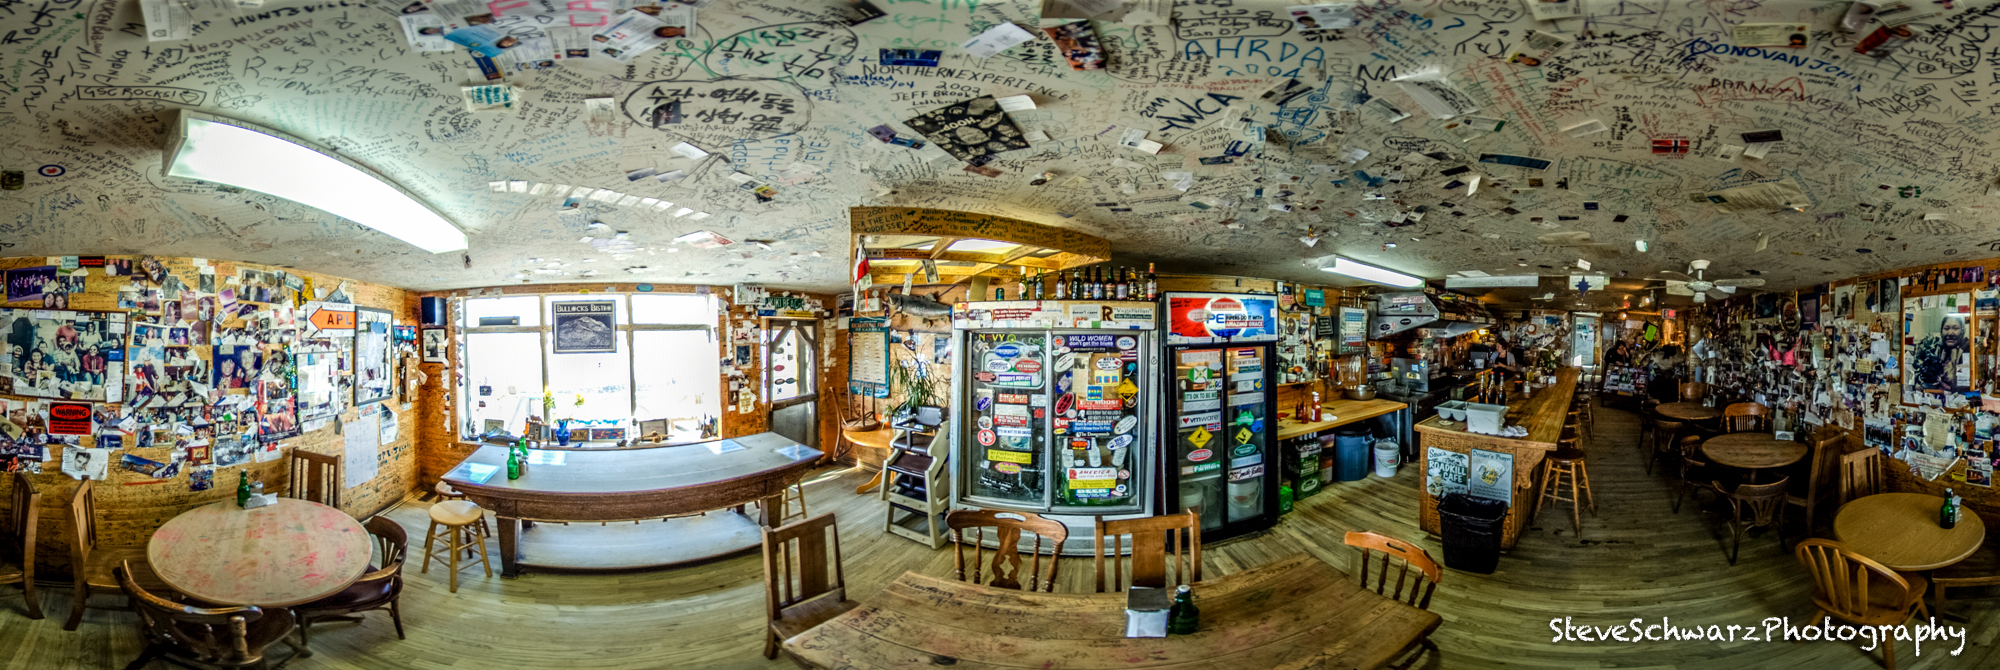
Bullocks Bistro, in Old Town Yellowknife serves up the best fish in town, and is often featured on CBC Arctic Air. Can’t think of too many restaurants that actually let you, and encourage you to leave your mark on the ceilings and walls !.
 Click on the image to see it bigger.
To view a 360 degree animation of this scene, Click Here. This requires the QuickTime Player. Click the icon on the upper right corner of the animation to get a full view. Depending on network speed, the image may take a moment to load.
Everyone’s favorite place to be on a hot sunny day….The Beer Garden (2012 Folk on the Rocks)

To view the 360 degree animation of “Snake People” in the Beer Gargen . Click Here This requires the QuickTime Player. Click the icon on the upper right corner of the animation to get a full view.

Pilot’s Monument is the best place to go for a scenic view of Yellowknife Bay, Old Town, with its unique character and Downtown Yellowknife (actually up the hill from Old Town). After climbing the stairs to the top of the hill, the view is spectacular. At the top there is a brass plaque as a tribute to northern pilots.
In this image, downtown Yellowknife is directly under the sun on the right side of the image. Pilot’s Monument is in the middle of the photo, and Back Bay is on the far left.

Click on the image for a larger view.
To view the 360 degree animation. Click Here. This requires the QuickTime Player. Click the icon on the upper right corner of the animation to get a full view. Depending on network speed, the image may take a moment to load.
Camera gear: Nikon D700 and a Peleng 8mm lens on a custom monopole. Six pictures were combined to create the panorama images on this page.

Bullocks Bistro, in Old Town Yellowknife serves up the best fish in town, and is often featured on CBC Arctic Air. Can’t think of too many restaurants that actually let you, and encourage you to leave your mark on the ceilings and walls !.
Click on the image to see it bigger.
To view a 360 degree animation of this scene, Click Here. This requires the QuickTime Player. Click the icon on the upper right corner of the animation to get a full view. Depending on network speed, the image may take a moment to load.
Camera gear: Nikon D700 and a Peleng 8mm lens on a custom monopole. Four pictures were combined to create the panorama images on this page.

Folk on the Rock (FOTR) started as a small gig in 1980, and has now considered to be one of Canada’s BEST music and cultural festivals.
Highlights include artists and musicians from across the north, across Canada and international all coming together for a weekend of musical and cultural magic on six separate stages. FOTR is held on the third weekend of July, in Yellowknife.
 A split view of the Main Stage.
 A view of the Cultural Stage. Click on the image for a larger view.
To view a 360 degree animation of this scene, Click Here. This requires the QuickTime Player. Click the icon on the upper right corner of the animation to get a full view. Depending on network speed, the image may take a moment to load.
 “Little Planet” view of the Kids Stage. Click on the image for a larger view. Click ‘back’ on your browser to return to this page.
View a 360 degree animation of the Main Stage, Click Here. Click the icon on the upper right corner of the animation to get a full view.

“Little Planet” view of the Main Stage. Click on the image for a larger view. Click ‘back’ on your browser to return to this page.

To view a 360 degree animation of “And the woman said” on Stage Left. Click Here This requires the QuickTime Player. Click the icon on the upper right corner of the animation to get a full view.
Everyone’s favorite place to be on a hot sunny day….The Beer Garden
To view the 360 degree animation of “Snake People” in the Beer Gargen . Click Here This requires the QuickTime Player. Click the icon on the upper right corner of the animation to get a full view.
To view the 360 degree animation of “Hot Vibrator” in the Beer Garden. Click Here This requires the QuickTime Player. Click the icon on the upper right corner of the animation to get a full view.

“Little Planet” view of the Beer Garden. Click on the image for a larger view. Click ‘back’ on your browser to return to this page.
Camera gear: Nikon D700 and Samyang/Bower 8mm on a monopole. Four pictures were combined to create the panorama images on this page.

To celebrate May Day (May 1st) and the coming of spring, I headed up MacEvoy Rock in Yellowknife’s Old Town. Of the two hills in Old Town, Pilot’s Monument is higher and far more popular that MacEvoy Rock. For creating panoramas and a quite place to hang out, MacEvoy Rock suits me perfectly.
In this image, downtown Yellowknife is directly under the sun on the right side of the image. Pilot’s Monument is in the middle of the photo, and Back Bay is on the far left.
Click on the image for a larger view.

Click ‘back’ on your browser to return to this page.
To view the 360 degree animation. Click Here This requires the QuickTime Player. Click the icon on the upper right corner of the animation to get a full view.
Compare to Panorama from July 12, 2011.
Camera gear: Nikon D700 and Nikon 20mm/2.8 lens on a monopole. 12 pictures were combined to create the panorama images.
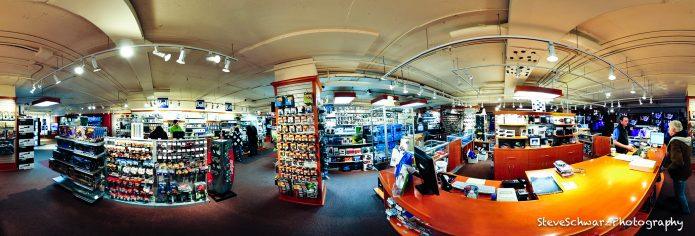
A blustery spring afternoon seemed like the perfect time to wander through Roy’s Audiotronic shop on the lower level of the Yk Mall in Yellowknife NWT.
Click on the image for a larger view.
To view the 360 degree animation click on this image

Click the icon on the upper right corner of the animation to get a full view. Click the mouse and drag the screen to move around.
This animation requires the Quicktime Player.
Camera gear: Nikon D700 and Samyang/Bower 8mm on a 7 foot pole. Four pictures were combined to create the panorama images.

The Greenstone Building (also known as Government of Canada Building) was designed as a environmentally friendly building, and was the first building north of the 60th parallel to win a LEED Gold certification. Even from a distance, the four-story Greenstone Building in downtown Yellowknife can be recognized by its unique architecture.
Environmental “Green” features are incorporated at every level of the building, starting at the rooftop with a rain water collection for site irrigation and toilet flushing, solar panels and gigantic ‘towel rack’ (sun shield) on the entire south wall, together with various energy saving devices to decrease its energy demand, such as operable windows for ventilation instead of turning on on air conditioning, triple glazed windows, and high-efficiency mechanical systems to save on energy costs and reduce greenhouse gas emissions. Materials used during construction include a many re-used materials, include by‐products from burning coal added to the concrete, and carpets created from old carpet fibres and recycled milk jugs and pop bottles.
The interior design is based on Yellowknife’s mining heritage, with stairs representing a mining shaft, and abrupt off-sets on the floor to represent geological faults.
Click on the image for a larger view.
To view the 360 degree animation click on this image

Click the icon on the upper right corner of the animation to get a full view. Click the mouse and drag the screen to move around.
This animation requires the Quicktime Player.
Camera gear: Nikon D700 and Samyang/Bower 8mm on a 7 foot pole. Four pictures were combined to create the panorama images.

From the Legislative Assembly to the Yellowknife city dump.
Scroll down to see the Images
The Yellowknife city dump is probably the only dump in North America where you are allowed to salvage, meaning that what ever you see – you can take home.
On weekends during the summer months the dump can be a busy place with line-ups just to get in. Although there do seem to be ‘professional salvagers’ collecting items of monetary value e.g. aluminum beverage cans, salvagers include persons from all levels of society – the rich and the needy. On a warm sunny day, ‘dumpers’ are known to linger and chat with fellow dumpers and salvagers. The conversation may be interrupted when something catches their eye as it is tipped out of a pickup truck. As times, salvagers have even offered to remove items from your truck even before you get a chance to unbuckle your seatbelt !.
During the past few years, the Yellowknife dump has become more organized. Pay the $5 dollar tipping fee at the entrance gate, and you pass the standard Blue Box recycling bins (tin cans, paper and plastic), to where the fun begins. The paint depot (pick up a can or two of paint – perfect for finishing off that living room wall in …really, what ever color you want), then the ‘white’ appliance area (stoves, refrigerators, hot water tanks etc), the wood area (seriously depleted during the winter !), and the scrap metal area.
Following the road, it goes past the battery collection area up the hill skirting a huge pile of tires to the the main section of the dump. Until a few years ago there was one dumping area for everything else. Now, there is a rotating Three Cell System; Dump Here, Salvage Here and the third area is closed – undergoing renovation (fancy word for bulldozers are in-action making space for next week). The Dump Here area is where you can find anything, and everything; furniture, tools, clothing, musical instruments, building supplies, appliances, toys, TVs, computers, even boats.
To view a 360 degree animation of the Three Cell area click on this image.

Click the icon on the upper right corner of the animation to get a full view. Click the mouse and drag the screen to move around.
In the wreaked cars area there are piles of cars in various states of dis-assembly. Once sufficiently picked over by salvagers, the wreaks are squishied in square bales for shipping smelters in southern Canada.
To view a 360 degree animation of the car salvage area click on this image

Click the icon on the upper right corner of the animation to get a full view. Click the mouse and drag the screen to move around.
The Yellowknife dump is so popular, that there is a weekly article in the Yellowknife newspaper (Walt Humphries – Tales from the Dump), and it has been featured on several TV programs, such as CBC Wayne Rostad “On the Road Again”, and numerous magazines including UpHere (One Man’s Junk is Another Man’s Treasure), Canadian Living (Go green: Shopping at the Yellowknife dump), the Walrus (The last great city dump. Throwing it all away in Yellowknife), and the New York Times (Rush to the Garbage Dump: There’s Gold to Be Mined).
We leave you with a final image of the Yellowknife Dump, photographically distorted to resemble a planet covered with wreaked cars.

Camera gear: Nikon D700 and Samyang/Bower 8mm on a 7 foot pole. Four pictures were combined to create the panorama images.