These photo were posted on my Flickr account (SteveSchwarzPhotography). I no longer upload to this account. The photos below link directly to the Flickr account. If you have any questions, or comments about these photos – drop me aline,
These photo were posted on my Flickr account (SteveSchwarzPhotography). I no longer upload to this account. The photos below link directly to the Flickr account. If you have any questions, or comments about these photos – drop me aline,
Starting January 10th, 2022 – A New Career. It is career number …Navy, Geologist, Mineral Development Advisor, Remote Sensing Analyst and and soon – Lands Specialist.
As I write this – Three days to go. It has been a run of 20 years. Bitter sweet to be leaving, especially after the release of the Long Term Change Detection (LTCD) dataset, development of the LTCD User Guide and doing a CBC radio interview. Leaving on a good note, and it is time to move on. The commute will be to the other side of the building, new colleagues, and a completely new job.
Thinking back of the projects I have worked on since 2002. A ton of writing computer code and data processing, creating seamless mosaics of topographic data for all of NWT, forest fire burn severity, identifying and counting caribou and bison using satellite images, flood map predictive models, PM for collection of air photos over proposed Mackenzie Gas project and Mackenzie Delta, mapping coastal erosion at Cape Bathurst (360m in 38 years), and the highlight – the LTCD project for developing scripts to process 40 years of satellite data using Google Earth Engine.
Over the years technology and computer systems evolved from needing high end desktop computer, specialized remote sensing software and having to download satellite data (100’s of Gb per day) to cloud enabled computing – I can run the scripts and process satellite imagery using my phone !. My Thanks to the many colleagues, and my classmates at COGS (2000-2001).
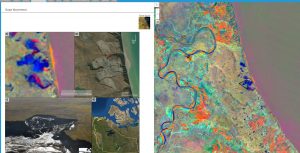
Mapping Coastal Erosion at Cape Bathurst, NWT.
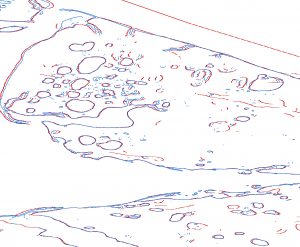
Mapping coastal erosion – the Old way. Converting the raster (satellite picture into a line layer). 1972 coastline in red, satellite picture (blue outline) from 2010.

Schematic of the changes in the coastline at Cape Bathurst, years and coastline shown.

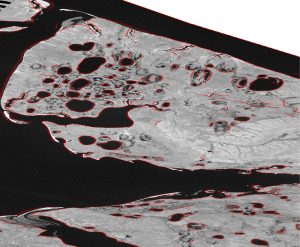
Coastal erosion shown in blue using the LTCD script. Takes 20 minutes to run – instead of 3 days of eyeball strain !.
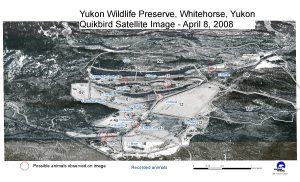
Counting wildlife using a satellite image. Satellite is in orbit approx 800km above earth.
Wildfire Burn Severity mapping:
2014 Wildfires in NWT.
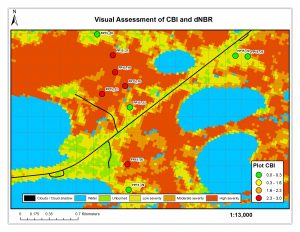
Wildfire Burn Severity analysis.
Mackenzie Gas Pipeline Airphoto Project:
Wrote specifications and contract managed for 1;30,000 scale airphotos covering Mackenzie gas Pipeline route (pipeline yet to be built) and Mackenzie Delta,and creating of 1 meter contours and digital elevation model (DEM).
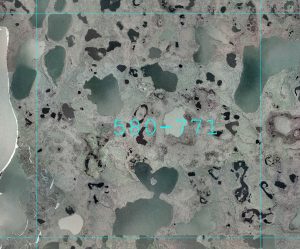
1:30,000 scale airphoto tile.
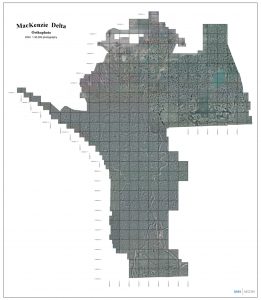
Area covered by MVAP tiles, contours and DEM (extends down Mackenzie Valley).
Long Term Change Detection (LTCD):
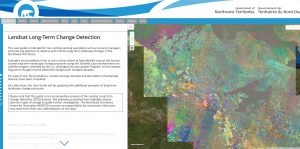
Long Term Change Detection – User Guide.
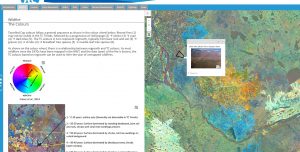
LTCD User Guide. Description of colours for wildfires.
LTCD User Guide. Sample images of slope movement.
Read more about the User Guide and ESRI ‘App’ of the Month, and CBC Weekender radio interview here:
https://www.geomatics.gov.nt.ca/en/newsroom/long-term-change-detection-wins-esri-canadas-app-month-december-2021

Blackstone Territorial Park, is a small campground located approximately 115km north of Fort Liard, and 166km south of Fort Simpson, Northwest Territories, Canada. The park is located on the bank of the Liard River and is the starting/ending point for many paddle trips and river rafters from Nahanni National Park. From the shores of the Liard River one can see the very popular Nahanni Mountain Range.
These photos from a road trip from Yellowknife to Whitehorse road trip, passing through Blackstone Territorial Park on Aug 3rd-4th, 2013. All photos on this page taken with a Nikon D700 and Nikon 14-24mm lens.

View of the Nahanni Mountain Range from the Visitors Centre

Enjoying the view over the Liard River and Nahanni Mountain Range from the Visitors Centre

Walking along fallen trees along the shoreline of the Liard River

Typical view of the Liard Highway. Yes – it is a gravel road

At last count there are 130 forest fires in the Northwest Territories.
Check out the image below to see where they are.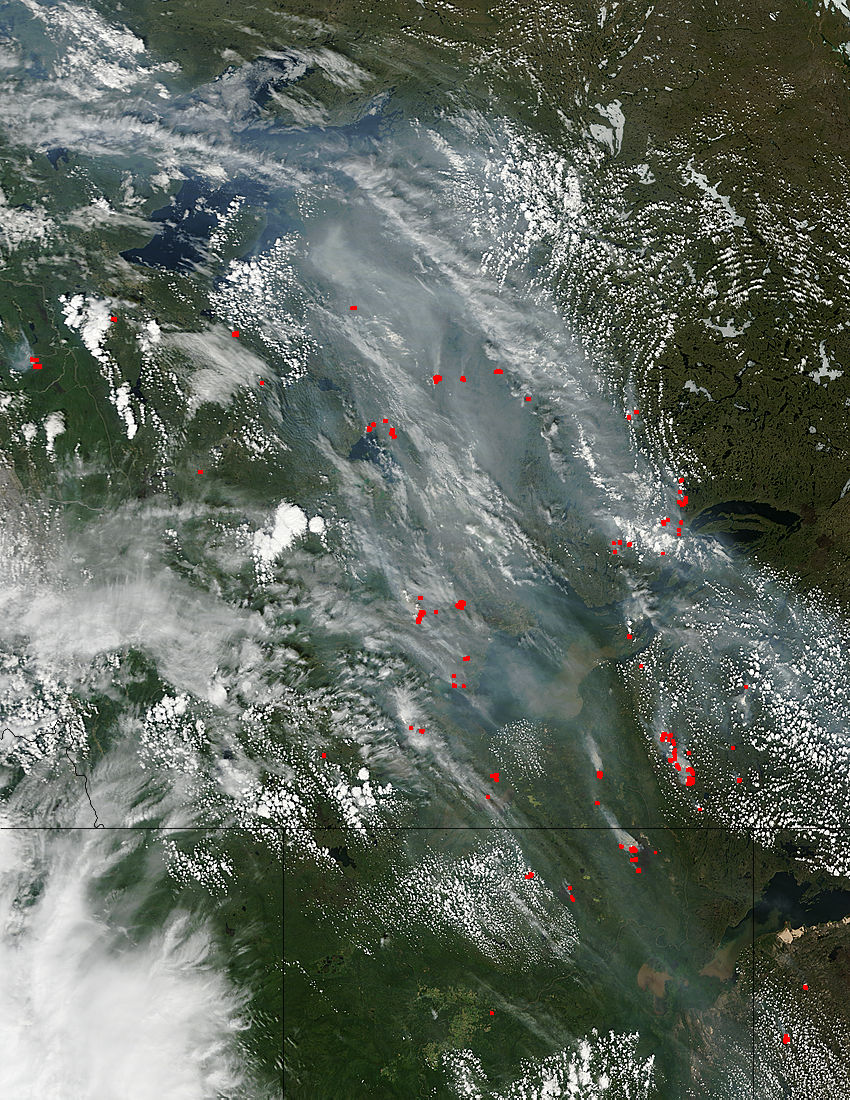 Satellite image from July 2, 2014.
Click here to go to the NASA webpage.
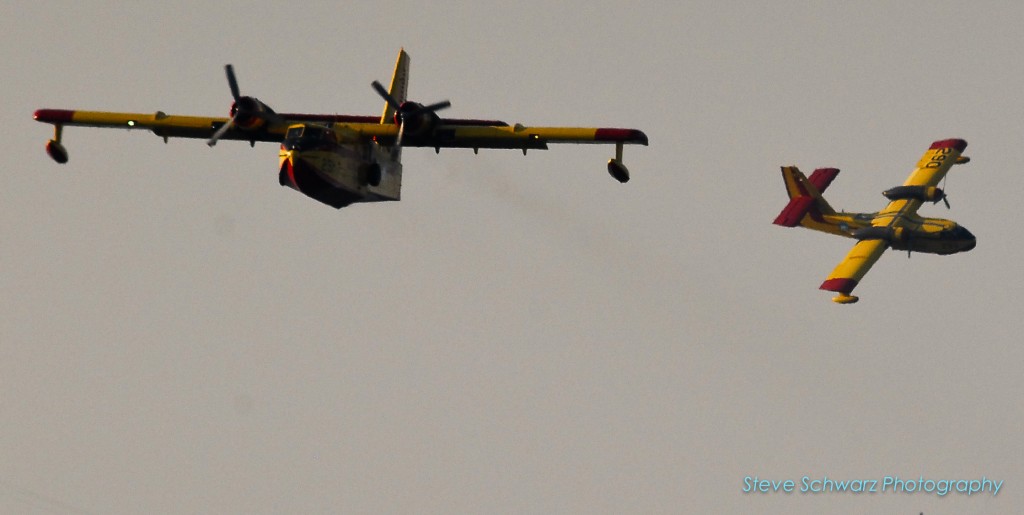
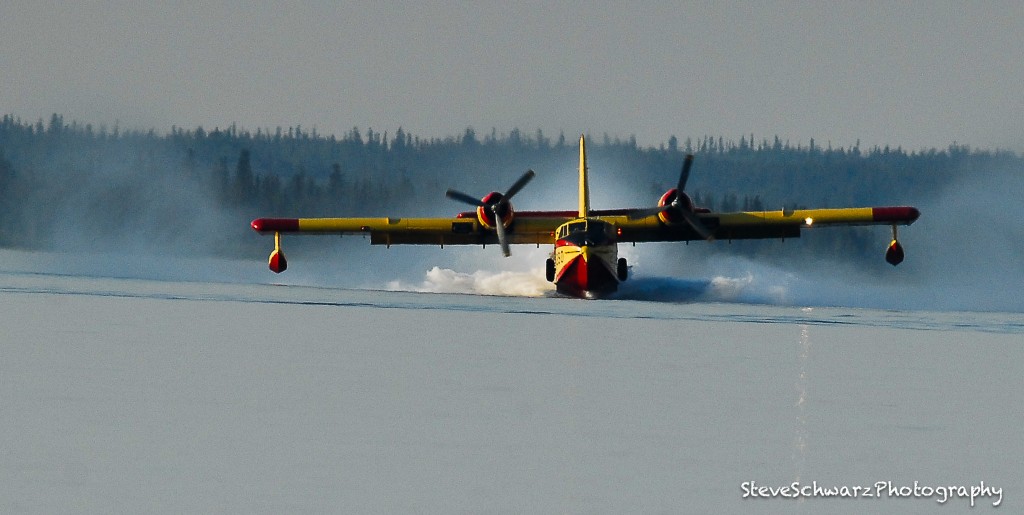
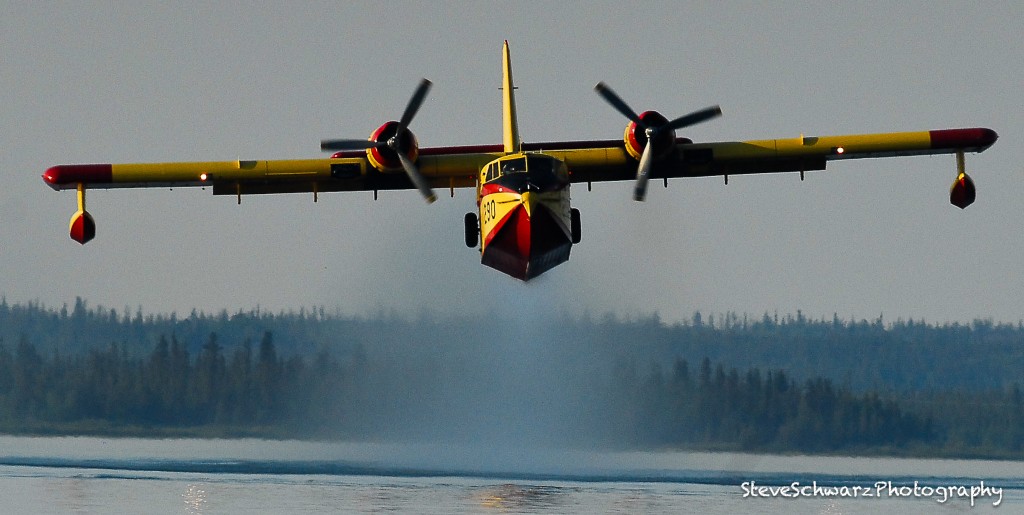
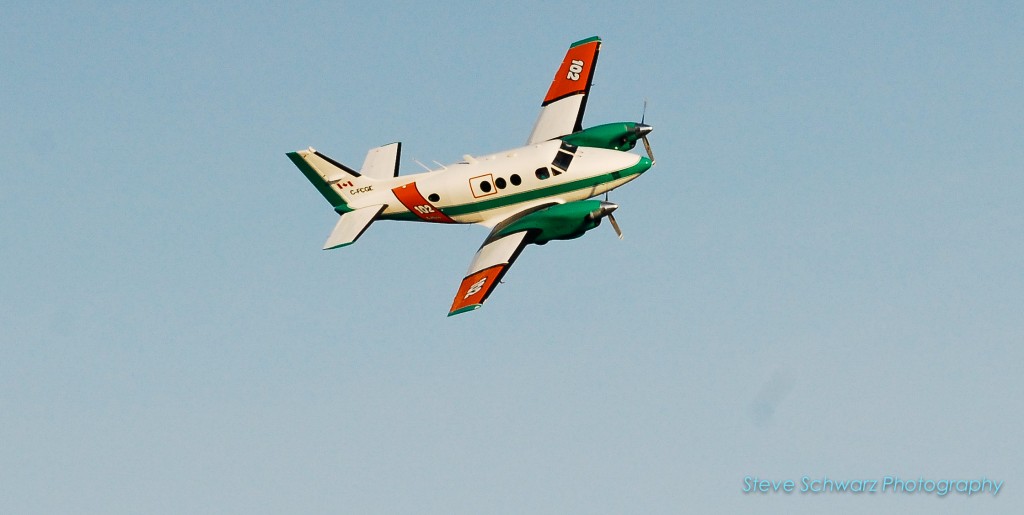
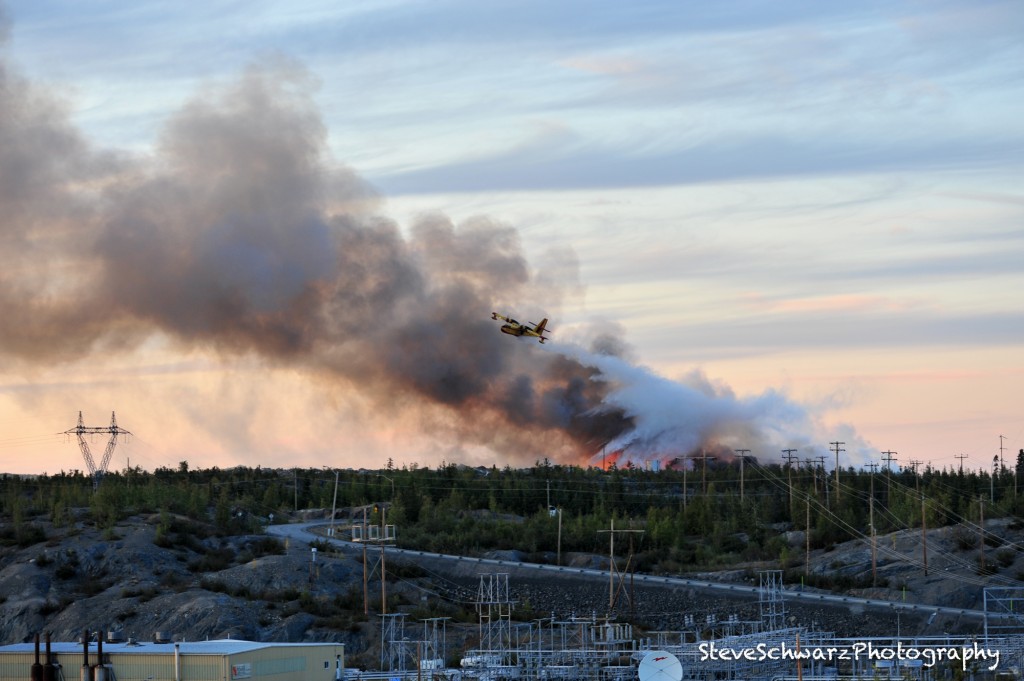
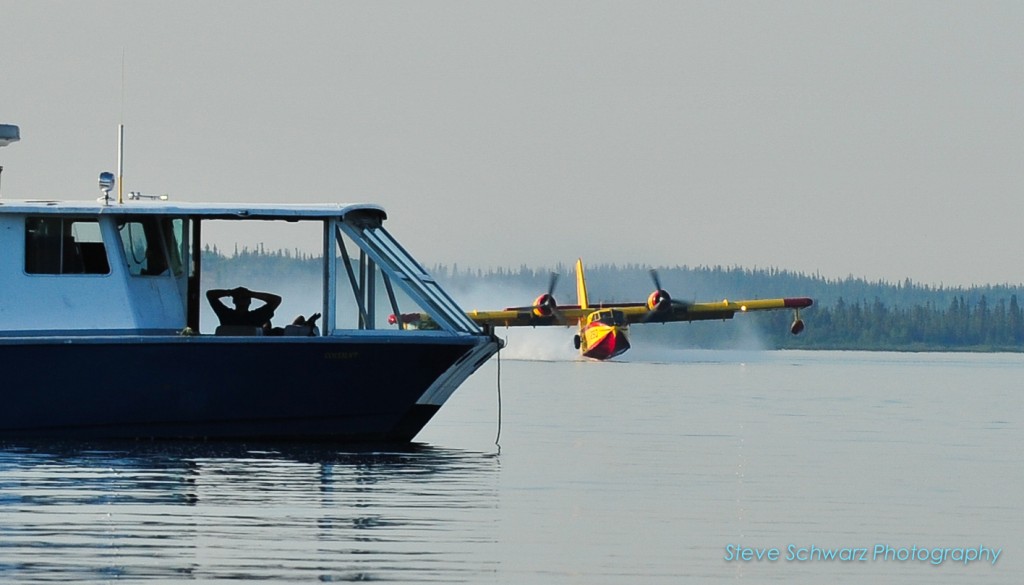
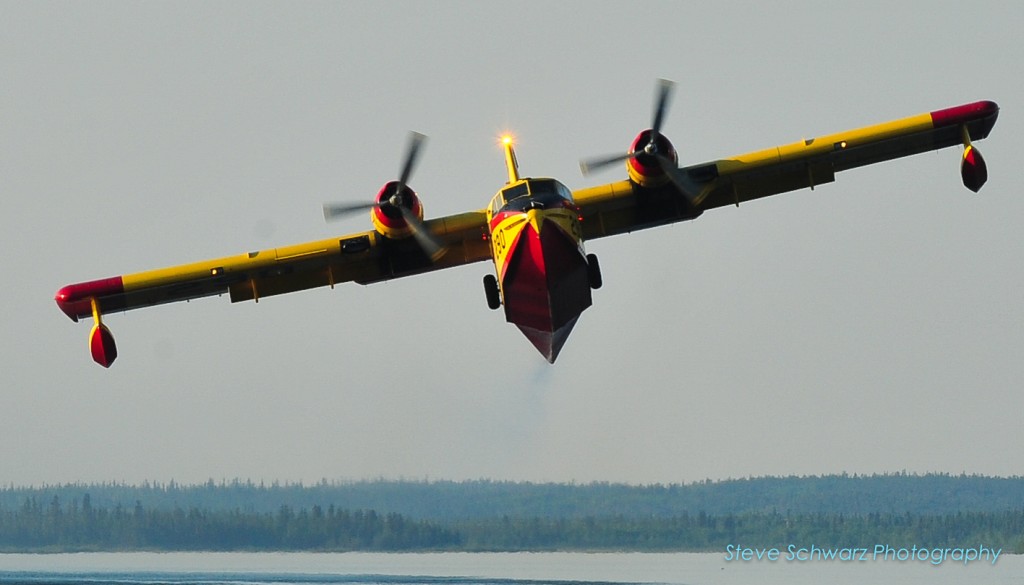
A couple of photos of Canadair Cl-215 water bombers that are being used to fight some of the forest fires, and a Beechcraft ‘Birddog’ airplanes for fire attach planning and flight safety. The photos were taken in Yellowknife a couple of years ago while putting out a fire at the City landfill. All photos taken using a Nikon D700 and manual focus Leica Telyt 400mm f/6.8 lens with a Leitax adapter.


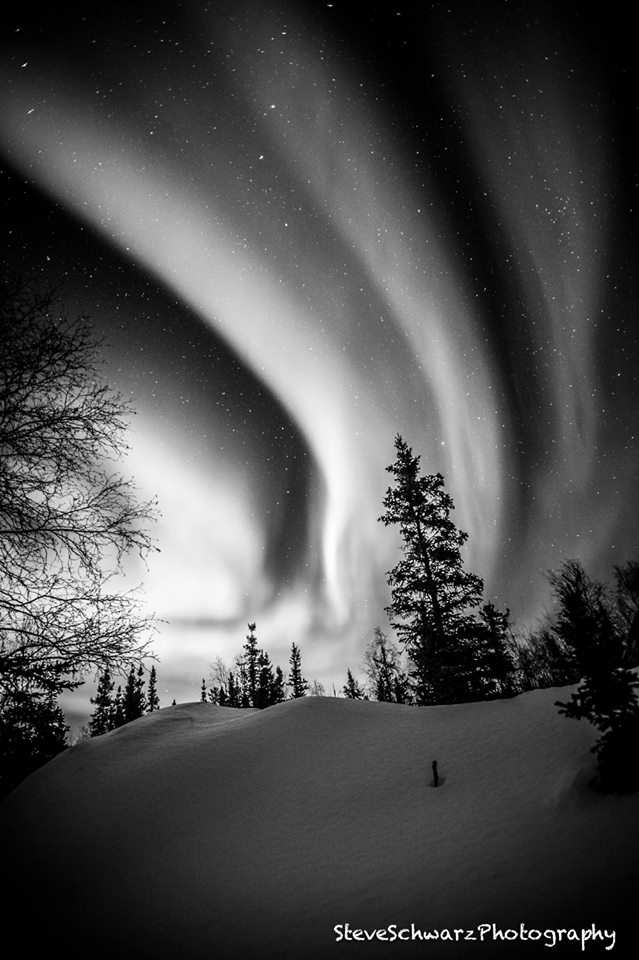
Twin Pine Hill – one of best places to enjoy a scenic view of Old town Yellowknife, and Great Slave Lake. These 360 degree panoramas were created from photos taken on May 18th, 2014.
In this view, Old Town is in the distance, to the north. Franklin Avenue (center of photo) separates Peace River Flats and Willow Flats (right side) and continues to Latham Island and N’Dilo in the distance. If you look carefully, the melted remnants of the Snow Castle can be seen, along with house boaters commuting across the ice, and a even a kite skier behind the houseboats.

Click on the image for a larger view.
To view the 360 degree animation. Click Here. This requires the QuickTime Player. Click the icon on the upper right corner of the animation to get a full view. Depending on network speed, the image may take a moment to load.
In this image, along the ridge to the southeast of the previous photo, Old Town (Willow Flats) is on the far left. The road winding up the hill is School Draw, an the remains of a recently burnt house can be seen in the center part of the photo.

Click on the image for a larger view.
To view the 360 degree animation. Click Here. This requires the QuickTime Player. Click the icon on the upper right corner of the animation to get a full view. Depending on network speed, the image may take a moment to load.
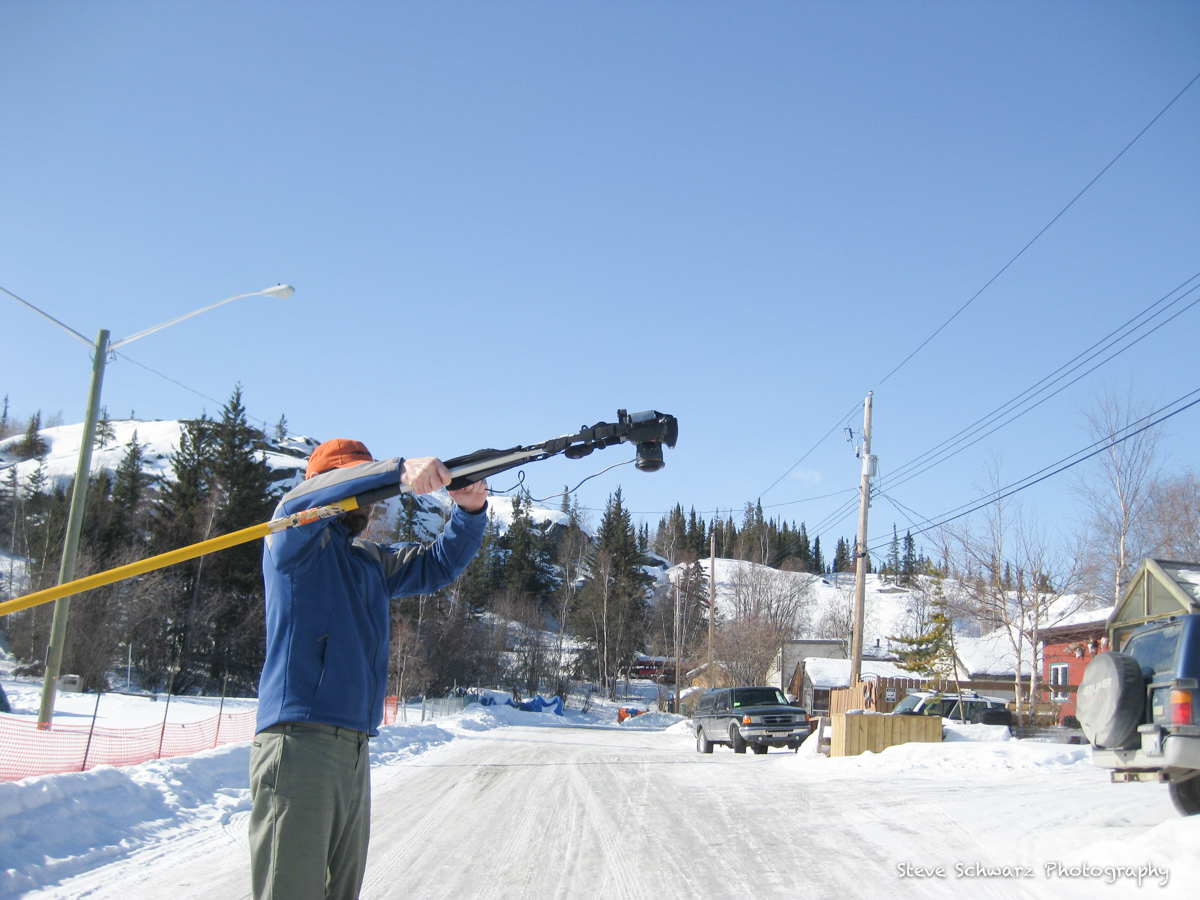
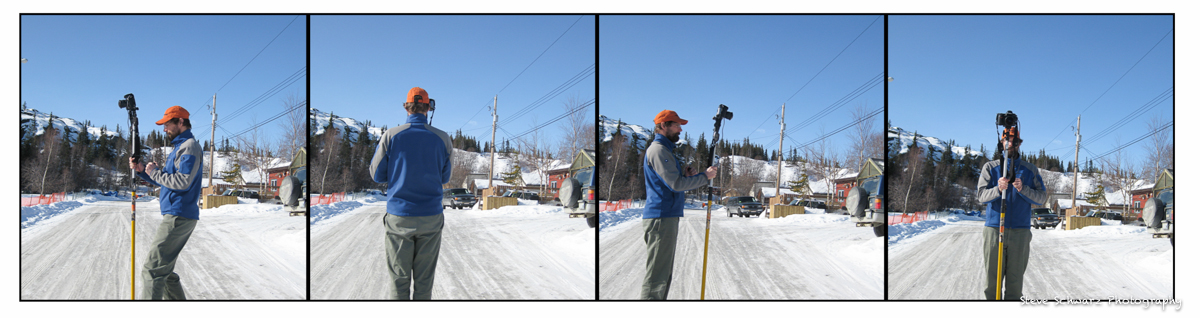
These panoramas were created by combining 5 photos (4 photos at 90 degrees to each other, and the fifth taken straight down at my feet to fill in a gap), using a Nikon D700, a ‘shaved’ Samyang 8mm lens with a custom built panorama head see Making Panoramas with a DIY Panoramic Head and a Monopole. The hardest part of making these panoramas was photoshopping out all the garbage and smashed bottles…

These notes describe the tools and technique that I use to create 360 and spherical panoramas. If you are interested in producing high resolution landscape or architectural panoramas – this is not for you as these types of panoramas require different tools (panorama heads, tripods and lenses). Check out the links below on tools and techniques to create high resolution and architectural (including interior) panoramas.
360 degree panoramas are best described as panoramas that cover up to 360 degrees in a single, super wide image, whereas Spherical panoramas can be described as the viewing of a seamless 360 degree panorama that is displayed on a interactive viewer (e.g. QuickTime VR, Flash or HTML5), and allows the observer (i.e. You) to interactively pan left or right, up and down and zoom in or out to look at the scene in different directions. The end result of spherical panoramas, is to give the observer the feeling of actually “Being there and looking around”.
The first step in making spherical panoramas is to create a seamless 360 photograph, that is wrapped in a sphere or cylinder. There are different methods to capture the separate photos that are stitched to create the seamless 360 degree image; ranging from more accurate (panoramic heads with lens specific clicks) to free hand (dangling a weight from a string over a specific feature on the ground). All methods require that the camera is rotated through an imaginary point ‘entrance pupil’ near the front of the lens to avoid (or minimize) visual off-set (parallax) when stitching the photos. Generally, the fewer images to stitch the less effect of parallax.
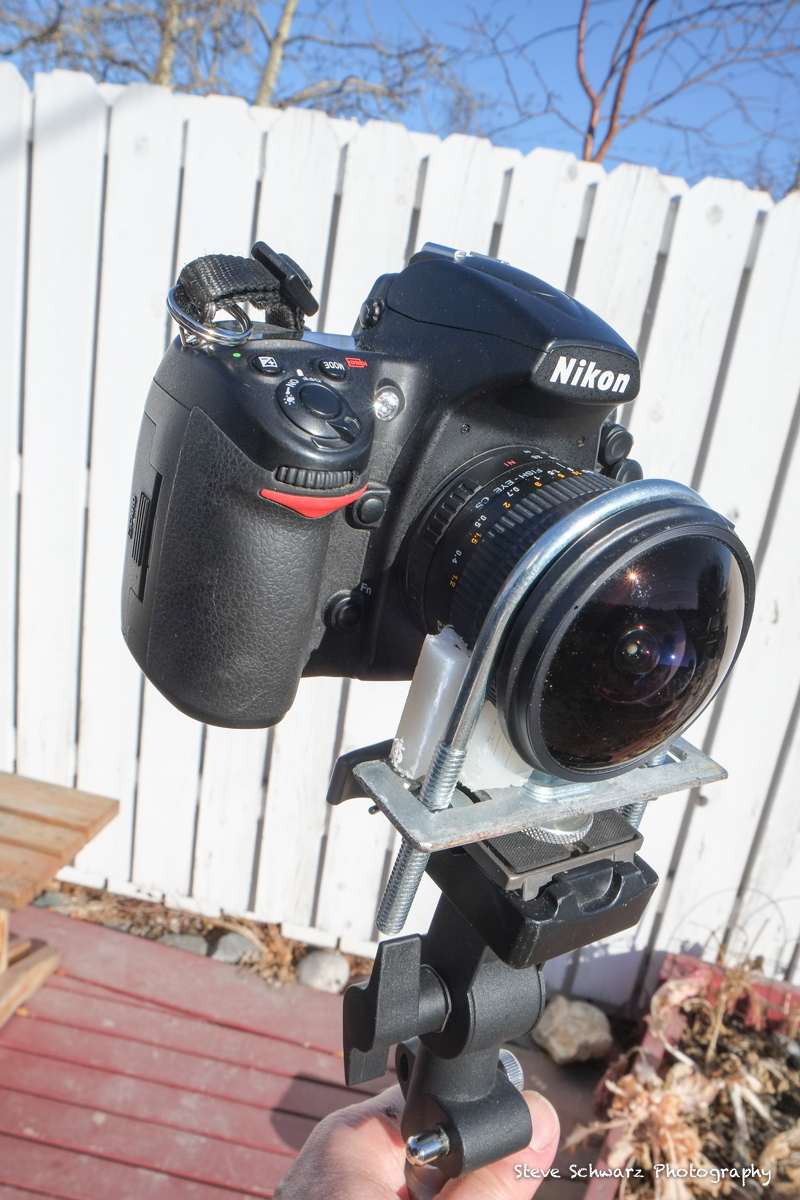
The tools that I use include a Nikon D700 camera, Samyang 8mm f/3.5 lens, a very simply DIY (make-it-yourself) panorama head, remote cable, and a monopole. Previously I did not use a panorama head, and simply mounted the camera to the monopole using the tripod screw on the base of the camera. This method works well as long there are no objects close to the lens (i.e. wide open areas), which cause parallax. Now, with a simple DIY panorama head (total cost approx. $10.00) there are fewer problems with parallax. Do note – that these tools and techniques work for me, and may not work for you, nor is this technique necessarily the correct or most accurate.
From top to bottom, I use the following camera gear and tools.
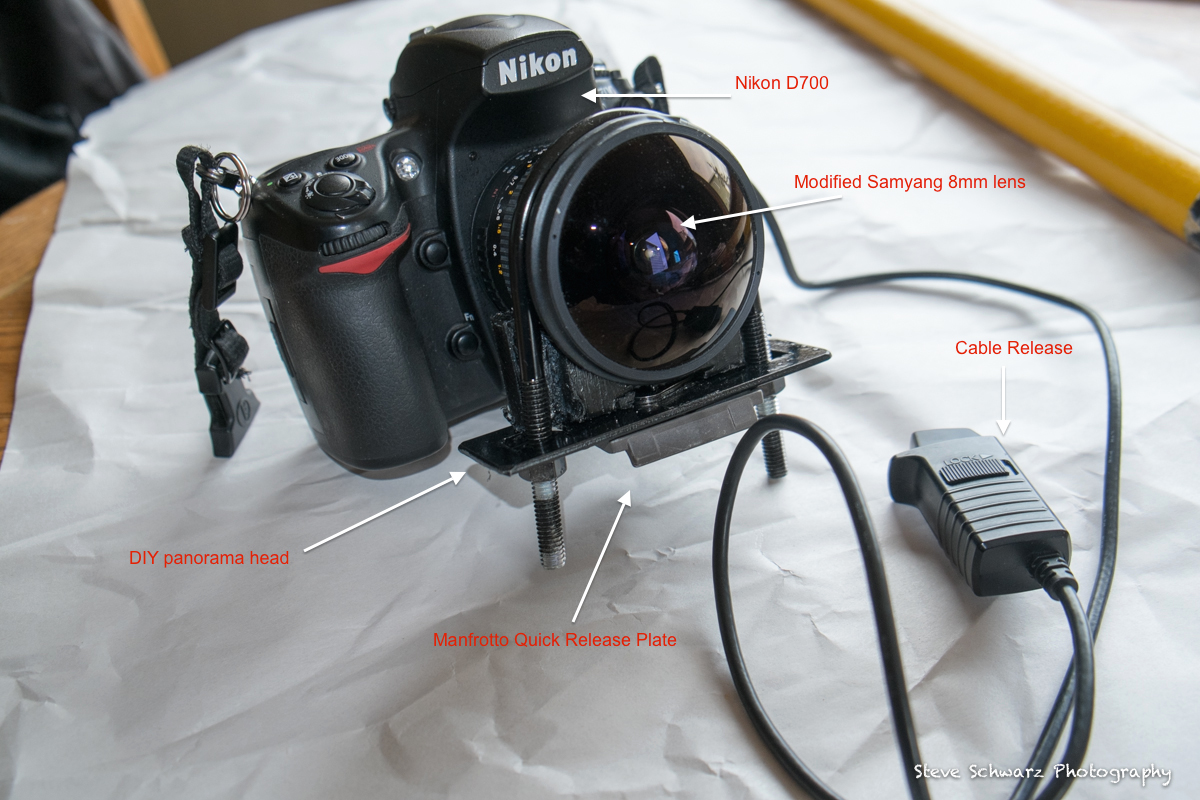

My initial plan for a DIY panorama head was piece of metal plate that attached at one end to the camera tripod screw the the other end extending to the entrance pupil of the lens. However, the thought of the relatively heavy Nikon D700 bouncing up and down on the metal plate deterred that plan. Plans then turned to some way of attaching the front of the lens directly to the monopole. Then I found a muffler clamp. Sliding the muffler clamp over the entrance pupil of the lens – it was a close fit, and the U-shaped clamp only had to be widened by approximately 0.5cm. Scrap UHMW plastic was used to fill in gaps between the lens and the muffler clamp. A sheet of scrap metal (steel) was cut and drilled for the base, and two ¼ thread nuts are used to tighten the muffler clamp (finger tightened only). A coat of black automotive paint and adding the Manfrotto Quick Release Plate – then done !.
Total cost approx $10.00.
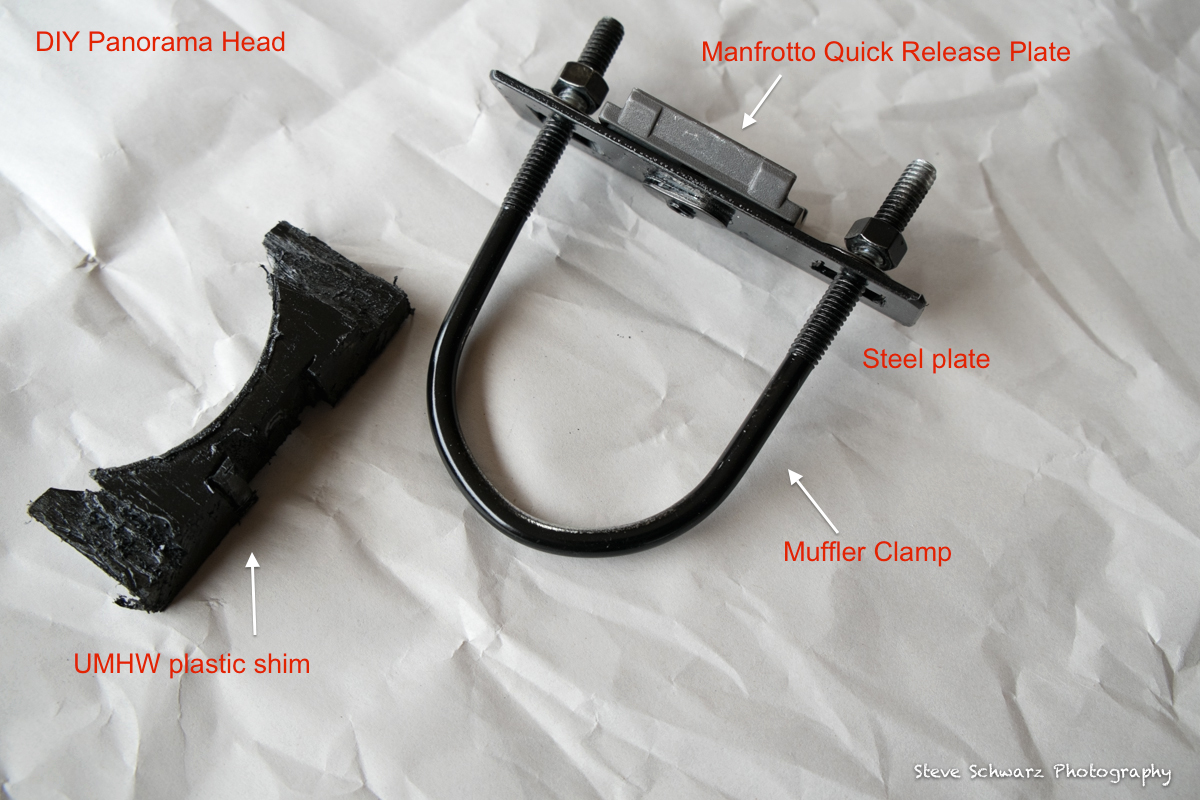
Note that the axis of rotation passes through the centre of the lens and the Nodal Point (entrance pupil).
These are the camera settings that I use;
1) File format set to ‘Raw’
2) Exposure mode set to ‘Manual’ – Set shutter speed minimum 1/30, aperture f/5.6 to f/10 depending on light conditions. Determine exposure for average light reading, not with lens pointed at the sun.
3) Set focus to manual
4) Set camera to full frame mode
Shooting Technique
To make my life easier, I always use the same lens and camera combination for spherical panoramas. With the shaved Samyang 8mm, I shoot four images each at 90 degrees apart (camera level).
One I have the four (or six) photos, they are loaded into PTGui software to create the seamless 360 degree panorama and the spherical panorama. Check the links below for how to use PTGui software. PTGui saves the spherical panorama as a Flash (.swf) movie that can be displayed on a website.
Examples of Flash (.swf) movies
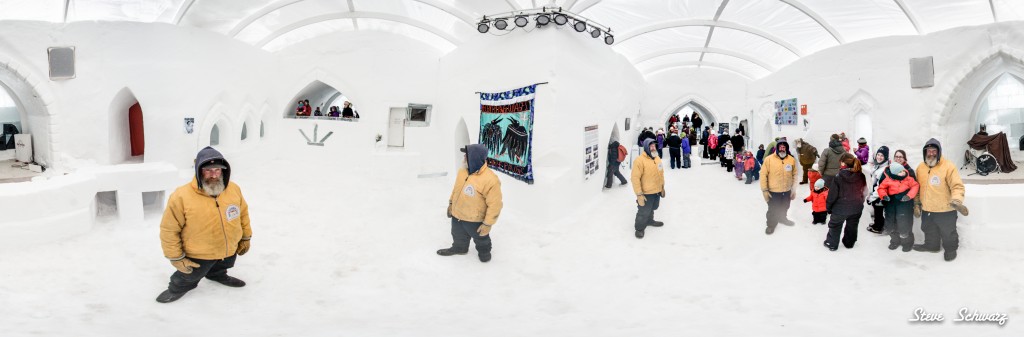
A view of the inside of the Snowking’s Castle, during the 19th annual Snowking Winter Festival. Click on the image for a larger view. To view the 360 degree animation. Click Here. This requires the QuickTime Player. Click the icon on the upper right corner of the animation to get a full view. Depending on network speed, the image may take a moment to load.
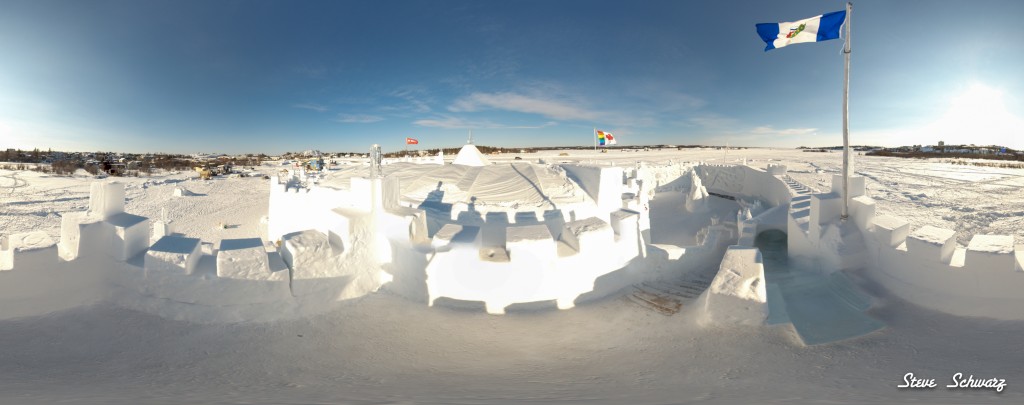
The view from the top of the Castle, and the “Deadman’s slide”. Click on the image for a larger view.
To view the 360 degree animation. Click Here. This requires the QuickTime Player. Click the icon on the upper right corner of the animation to get a full view. Depending on network speed, the image may take a moment to load.
Bullocks Bistro, in Old Town Yellowknife serves up the best fish in town, and is often featured on CBC Arctic Air. Can’t think of too many restaurants that actually let you, and encourage you to leave your mark on the ceilings and walls !.
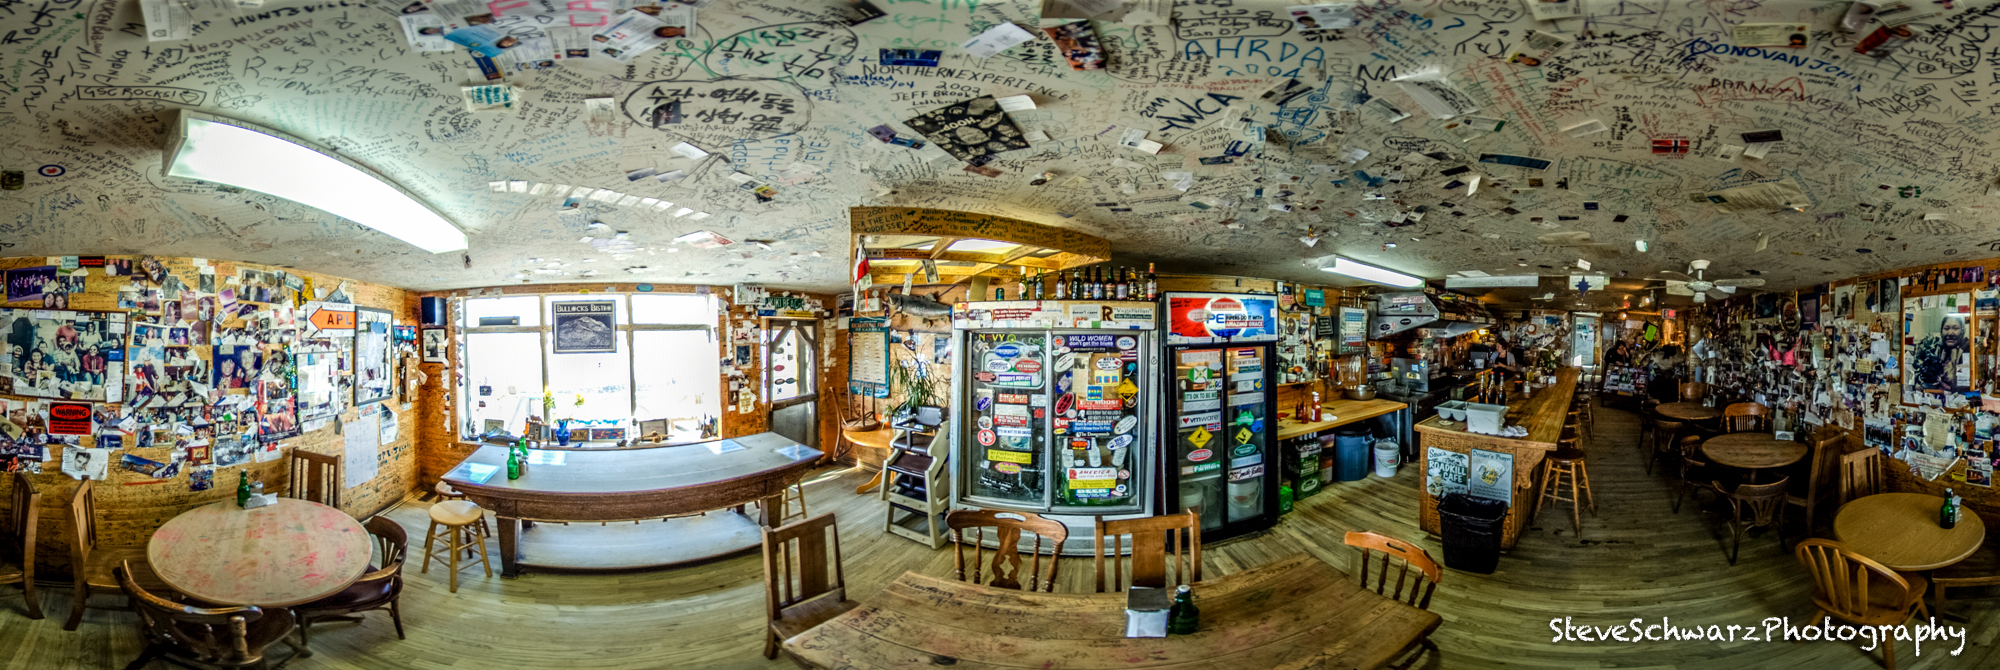 Click on the image to see it bigger.
To view a 360 degree animation of this scene, Click Here. This requires the QuickTime Player. Click the icon on the upper right corner of the animation to get a full view. Depending on network speed, the image may take a moment to load.
Everyone’s favorite place to be on a hot sunny day….The Beer Garden (2012 Folk on the Rocks)

To view the 360 degree animation of “Snake People” in the Beer Gargen . Click Here This requires the QuickTime Player. Click the icon on the upper right corner of the animation to get a full view.


Pilot’s Monument is the best place to go for a scenic view of Yellowknife Bay, Old Town, with its unique character and Downtown Yellowknife (actually up the hill from Old Town). After climbing the stairs to the top of the hill, the view is spectacular. At the top there is a brass plaque as a tribute to northern pilots.
In this image, downtown Yellowknife is directly under the sun on the right side of the image. Pilot’s Monument is in the middle of the photo, and Back Bay is on the far left.

Click on the image for a larger view.
To view the 360 degree animation. Click Here. This requires the QuickTime Player. Click the icon on the upper right corner of the animation to get a full view. Depending on network speed, the image may take a moment to load.
Camera gear: Nikon D700 and a Peleng 8mm lens on a custom monopole. Six pictures were combined to create the panorama images on this page.

Bullocks Bistro, in Old Town Yellowknife serves up the best fish in town, and is often featured on CBC Arctic Air. Can’t think of too many restaurants that actually let you, and encourage you to leave your mark on the ceilings and walls !.
Click on the image to see it bigger.
To view a 360 degree animation of this scene, Click Here. This requires the QuickTime Player. Click the icon on the upper right corner of the animation to get a full view. Depending on network speed, the image may take a moment to load.
Camera gear: Nikon D700 and a Peleng 8mm lens on a custom monopole. Four pictures were combined to create the panorama images on this page.

Folk on the Rock (FOTR) started as a small gig in 1980, and has now considered to be one of Canada’s BEST music and cultural festivals.
Highlights include artists and musicians from across the north, across Canada and international all coming together for a weekend of musical and cultural magic on six separate stages. FOTR is held on the third weekend of July, in Yellowknife.
 A split view of the Main Stage.
 A view of the Cultural Stage. Click on the image for a larger view.
To view a 360 degree animation of this scene, Click Here. This requires the QuickTime Player. Click the icon on the upper right corner of the animation to get a full view. Depending on network speed, the image may take a moment to load.
 “Little Planet” view of the Kids Stage. Click on the image for a larger view. Click ‘back’ on your browser to return to this page.
View a 360 degree animation of the Main Stage, Click Here. Click the icon on the upper right corner of the animation to get a full view.

“Little Planet” view of the Main Stage. Click on the image for a larger view. Click ‘back’ on your browser to return to this page.

To view a 360 degree animation of “And the woman said” on Stage Left. Click Here This requires the QuickTime Player. Click the icon on the upper right corner of the animation to get a full view.
Everyone’s favorite place to be on a hot sunny day….The Beer Garden
To view the 360 degree animation of “Snake People” in the Beer Gargen . Click Here This requires the QuickTime Player. Click the icon on the upper right corner of the animation to get a full view.
To view the 360 degree animation of “Hot Vibrator” in the Beer Garden. Click Here This requires the QuickTime Player. Click the icon on the upper right corner of the animation to get a full view.

“Little Planet” view of the Beer Garden. Click on the image for a larger view. Click ‘back’ on your browser to return to this page.
Camera gear: Nikon D700 and Samyang/Bower 8mm on a monopole. Four pictures were combined to create the panorama images on this page.
